Hands-on Reactive Programming with RxJS
Reactive Series - Part 3
— JavaScript, Reactive Programming — 14 min read
- Part 1 - Why You Should Consider Reactive Programming
- Part 2 - Fundamentals of Reactive Programming
- Part 3 - Hands-on Reactive Programming with RxJS
- Part 4 - Reactive Programming: The Good and the Bad
- Part 5 - Awesome RxJS and Reactive Programming Resources
This part of the series it's all about getting your hands dirty! Part 3 is a tutorial on core techniques to build an application with reactive streams using RxJS.
- Warmup - Handle a click event with RxJS
- RxJS Overview
- Let's build something!
- Level 1 - Combining streams of DOM events
- Level 2 - Hacking race conditions with artificial delays
- Level 3 - Merging streams into one stream
- Level 4 - Flatten observables, timers and cancellation
- Closing Notes
We're going to start with a small refresher from the previous article, implementing a click event handler with RxJS. Next, we'll have a brief overview of RxJS, followed by the main challenge of building a small animated game the reactive way.
Warmup - Handle a click event with RxJS
Here's how a usual JavaScript event handler function looks like.
1<button id="btn">+1</button>1const btn = document.getElementById("btn");2let counter = 0;3btn.addEventListener("click", (event) => {4 counter++;5 console.log(counter);6});In the above code, we're incrementing counter that is global and logging its value each time we update it.
Usually, we don't increment globals or console.log directly in real-life apps, but we do have other side-effects in place (like updating something else in the UI, triggering a web request, firing an animation, etc.). You can always organize your code to split concerns, but it seems the event handler is already doing two very distinct things, and we're barely getting started.
Let's take a look at how this looks like in the reactive world, with RxJS. Here's how you should visualize and implement a stream of click events.

e stands for event and it's the value pushed to the stream at each click in the button element, just like you would have an event argument in the typical onClick callback (event handler) at each click.
1let counter = 0;2const click$ = fromEvent(btn, "click");3click$.subscribe((event) => {4 counter++;5 console.log(counter);6});A few things to notice here:
- fromEvent is the tool in RxJS that will allow you to transform any DOM event into an Observable, a stream of events of a given type (like click, drag, scroll etc.).
subscribeis a must! Without subscribing to our stream, nothing would ever happen.- The
$is just a common (non-standard) notation to identify streams in your code - totally optionally, no need to follow.
Opposite to the click event handler, you can subscribe to the stream of clicks as many times as you want and split all kinds of different tasks into separate subscriptions that share the same event listener! Attaching event handlers to the DOM is costly especially due to the event attaching phase that happens at page load (onload or DOMContentReady events) a busy period for modern web applications - paraphrased from "High Performance JavaScript", book by Nicholas C. Zakas.
In a way, things are opening up, you get a more flexible model to organize your code, compared to the classic event handler callback.
Anything can be a stream, remember that, let it be the cornerstone of your reactive thinking.
This should get you warmed up for the real challenge later in the article. Before that, there's something I want to mention about the RxJS library.
RxJS Overview
I would highly recommend you later to go through the RxJS official docs overview; it complements a few concepts I've covered in the previous article giving you a more mature view into the fundamentals. But for now, I want to focus on two things only: creating streams and manipulating them. Looking at RxJS, you'll see that you can identify two big groups of "things":
- Stream creators/producers are tools that will allow you to take anything and make it a stream. In the previous section, for example, we used
fromEventto transform DOM click events into an Observable, a stream that you can subscribe to. - Operators are instruments that will allow you to not only hook into the stream to perform operations with the data flowing through it but also combine them.
Let's build something!
Now we've had our refresher, we can jump into building a small animated game with RxJS, something more complex.
The game we're building is called "Take the cat to the party", here's how it goes down.
- There's a cat in a motorbike in your top left corner (draggable HTML element).
- There's a decoy at the bottom left corner (draggable HTML element).
- There's a party at the right bottom corner of the page (our drop zone).
- We need to drop the cat at the party in less than 5 seconds to win. Nothing should happen if the decoy is the dragged element.
- While dragging, there's an animation of the cat driving to the party and a counter appearing at the top right corner.
- Per each attempt, if the cat is dragged for longer than 5 seconds you lose.
We're going to split this into 4 levels. Per each level, I'll explain the goal we're trying to achieve, show you how the implementation looks like, and what it does with plenty of detail. Feel free to try and code the levels yourself before checking the suggested solution. You can check out this repo if you're willing to give it a try. The file cat-party-empty.html contains the necessary boilerplate in a single HTML file. You can just open it in the browser and start coding.
Before we start, let's take a look at some boilerplate code already in place.
There are a bunch of RxJS taken from the global window at the top (I'm just injecting RxJS via <script> at the top of the HTML file). Then we have our markup appended to the element's app innerHTML. Just some boilerplate, don't bother with the detail.
1<head>2 <script src="https://cdnjs.cloudflare.com/ajax/libs/rxjs/6.5.5/rxjs.umd.js"></script>3 <script src="https://cdnjs.cloudflare.com/ajax/libs/rxjs/6.5.5/rxjs.umd.js.map"></script>4</head>5<body>6 <div id="app"></div>7 <script>8 const {9 map,10 // ...11 } = window.rxjs.operators;12 const {13 fromEvent,14 // ...15 } = window.rxjs;16 // ...17 document.getElementById("app").innerHTML = `18 <h2>Take the 🐈 to the 🎉</h2>19 <div id="loader" style="display:none;position:absolute;right:0;z-index:-1;">20 <img src="https://media2.giphy.com/media/cfuL5gqFDreXxkWQ4o/giphy.webp?cid=ecf05e479338392950f1cf8bade564aaec071e3aae3b68b0&rid=giphy.webp" width="248" height="248" style="opacity:0.5;"/>21 <span id="countdown" style="top:0;right:0;position:absolute;z-index:9999;font-weight:bold;font-size:46px;">-</span>22 </div>23 <div id="drop-zone" style="position:absolute;right:5px;bottom:5px;width:180px;height:180px;border:2px dashed black;z-index:2;"></div>24 <img src="https://i.ebayimg.com/images/g/qHEAAOSw01pdVAaZ/s-l300.jpg" width="150" height="150" style="position:absolute;right:20px;bottom:20px;"/>25 </div>26 <img id="cat" draggable="true" src="https://image.shutterstock.com/image-vector/vintage-scooter-cat-cool-stuff-260nw-429646657.jpg" width="100" height="100" style="position:absolute;z-index:1;margin:18px 16px;text-align:center;cursor:grab;"/>27 <div id="decoy" draggable="true" style="font-size:28px;position:absolute;left:20px;bottom:10px;text-align:center;cursor:grab;font-weight:bold;">DECOY</div>28 `;29 </script>30</body>The next block contains a few of the DOM elements we'll often be referring to.
1const cat = document.getElementById("cat");2const party = document.getElementById("drop-zone");3const loading = document.getElementById("loader");4const countdown = document.getElementById("countdown");Finally, we introduce three streams that we'll use quite often while going through the challenge. These are the most basic building blocks of our solutions.
1const dragstart$ = fromEvent(document, "dragstart");2const dragend$ = fromEvent(document, "dragend");3const drop$ = fromEvent(document, "drop");Level 1 - Combining streams of DOM events
- We should be able to take the cat to the party by dragging it.
- Place the cat inside the party together with other cats.
- We also want to hide the original cat element while dragging it for a better user experience.
Let's follow a bottom-up approach. We'll start by building some specific streams that will allow us to assemble more complex behaviors as we move along.
Let's start by answering the following: how do we know that an HTML element has been dropped at the party? We'll need to detect any drop event that occurs in the party element.
1const partyDrop$ = drop$.pipe(filter((event) => event.target === party));
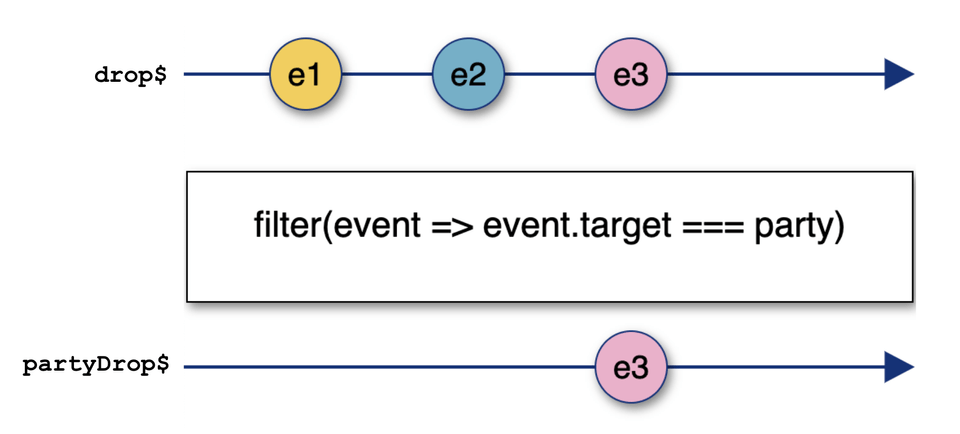
e stands for event and it's the value pushed to the stream at each drop event in the whole document! e1, e2 and e3 have different event.target (target DOM elements).
Cool, we now have a stream that emits a drop event every time something is dropped in the party, we ensure that using the filter operator.
I would like to pause and add further detail on this marble diagram. Notice that we read from top to bottom, meaning the last timeline is the only one that really matters, it's the fine grained stream that gives us more useful values. In this case since we won't subscribe to drop$ directly, think of it as an auxiliary conceptual timeline which is a step towards shaping the ideal stream to tackle our task: partyDrop$.
Another relevant detail on the marbles diagram: e1 and e2 marbles don't make it to partyDrop$ (bottom stream). For those events,
event.target it's not party, this means the user did not drop the HTML element in the party.
At this point we can already notice the exceptional compositional capabilities of streams and how easy it is to plug & play the smaller blocks (such as drop$) to build higher level streams.
Next, let's see how we can detect that the cat is dropped at the party.
1const catAtParty$ = partyDrop$.pipe(2 withLatestFrom(dragstart$),3 filter(([dropEvent, dragStartEvent]) => dragStartEvent.target === cat),4);Alright, a few things are going on here. We're familiar with withLatestFrom, but this time, it's a bit more complex to perceive. We're looking into a stream of dragstart events dragstart$ and asking it for the last value emitted in that stream; this is the same as saying that we want the last draggable element in the page that emitted a dragstart event! Next, we have filter again. We're going to use filter to narrow down our stream to allow dragstart events to pass through only if their target element is cat! And that's it! We have a stream that will emit an event every time we drop the cat at the party.
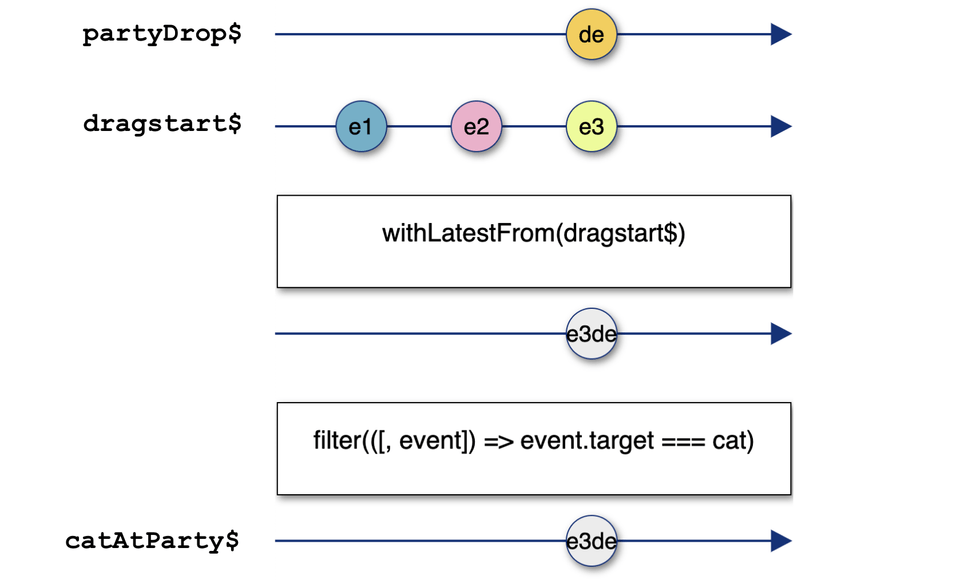
In the above diagram, e1, e2 and e3 are dragstart events (dragstart$ stream) that might come from anywhere in the page. de represents a drop event at the party. Notice how withLatestFrom operates by bringing together the last element on dragstart$ which is e3 and with the party element which is published to the dragend$ stream. Now because e3 event target is actually the cat you'll get e3 pushed to our final stream catAtParty$!
But we're not finished just yet; we need to leverage the work we've constructed so far to actually render the cat in the party. For that, we just need to subscribe to our catAtParty$ stream and do some DOM manipulations.
1catAtParty$.subscribe(([partyDropEvent, dragStartEvent]) => {2 // some console.logs to check what we really get subscribing to catAtParty$3 // console.log({ partyDropEvent, dragStartEvent });4 // console.log({ partyDropEvent: event.type, dragStartEvent: event.type });5 cat.remove();6 party.appendChild(cat);7});
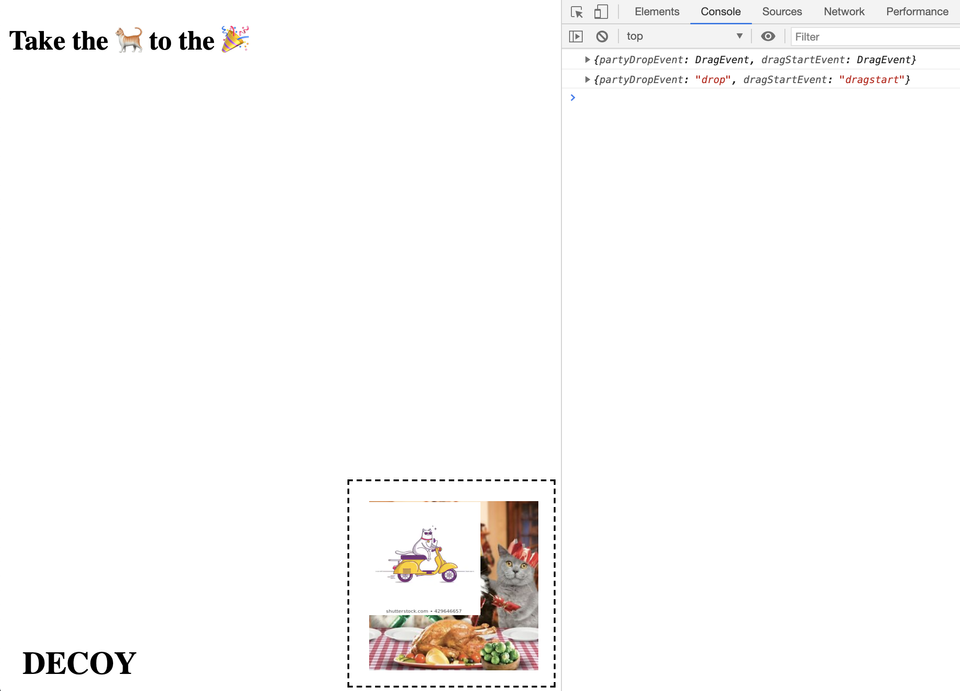
The console.log reveals the drop and dragstart events as payload for our subscription. We also log the event.type of each individual event.
If you're following this point, you'll notice that although we can drag the cat perfectly, we still see the original cat element while carrying it.
We see the original cat element while dragging it.
Setting the cat's element opacity to 0 yields a more natural user experience.
To achieve the same behavior we have in the above GIF, we want to toggle the cat element's opacity while dragging. Yes, another side effect, we can actually simply create another subscription to take care of this.
1const catDragStart$ = dragstart$.pipe(filter((event) => event.target === cat));2const catDragEnd$ = dragend$.pipe(filter((event) => event.target === cat));3catDragStart$.subscribe((event) => {4 cat.style.opacity = 0;5});6catDragEnd$.subscribe((event) => {7 cat.style.opacity = 1;8});And done with Level 1!
I want to leave a challenge for the reader. Looking at how we're setting the opacity value of the cat element, could we somehow handle everything in one single subscription instead of two? I would suggest you to read the whole article and come back to this one later, you should be then able to nail it then.
Hint
Check the operator merge.Solution
1const catDragStart$ = dragstart$.pipe(filter((event) => event.target === cat));2const catDragEnd$ = dragend$.pipe(filter((event) => event.target === cat));3const opacity$ = merge(catDragStart$.pipe(mapTo(0)), catDragEnd$.pipe(mapTo(1)));4
5opacity$.subscribe((value) => {6 cat.style.opacity = value;7});Level 2 - Hacking race conditions with artificial delays
- We should announce the cats' arrival with a
window.alertmessage.- Before triggering the
window.alertwe'll want to make sure thecatis actually rendered at theparty.
- Before triggering the
So we already have a stream that emits an event each time we drag the cat to the party, it's called catAtParty$. Our work here is mostly done. We just need to subscribe to it.
1catAtParty$.subscribe(() => {2 window.alert("Cat is at the party! You win!");3 window.location.reload();4});window.alert is triggered when we drop the cat at the party, but the cat is not rendered!
Hmm.. strange, we did everything right but the window.alert triggers before we get to actually render the cat at the party, what a bummer.
It seems that the DOM changes don't kick in before we trigger the alert; that's because the rendering is asynchronous, and the page only gets updated later on after we're done with executing this function and dismissing the alert. I don't want to spend much time fixing this since I don't have any mechanism to tell me whether the DOM node has been rendered successfully, I'm going to code a hack and trigger the alert inside a setTimeout that should buy us some time to correctly render the cat element.
1catAtParty$.subscribe(() => {2 setTimeout(() => {3 window.alert("Cat is at the party! You win!");4 window.location.reload();5 }, 100);6});Great! The window.alert is triggered after the cat element is rendered at the party!
It works. We can achieve a similar hack with RxJS without having a solution based on callbacks keeping our subscription handler clean (but still a hack!).
1catAtParty$.pipe(delay(100)).subscribe(() => {2 window.alert("Cat is at the party! You win!");3 window.location.reload();4});See that delay there? That's another operator. It allows you to hold the value in the stream for a determined amount of time before pushing it to the subscribers. So what's happening here is that instead of the Observer (subscription) being aware that we have to code a hack to trigger the alert after the cat enters the party, we shift that responsibility to the Observable, the stream is now the hacky code that is delaying the whole thing. This is super powerful, the way you can shift responsibilities and broadcast your changes to all the subscribers. Yes, all the subscribers will receive a delayed update! This can be simultaneously a gift and a wrecking footgun!
Level 3 - Merging streams into one stream
- We want to display a GIF while the cat is moving.
In our markup, there's a GIF positioned at the top right corner. We want to show it while dragging the cat and hide it again once we drop the cat.
We already have two streams: catDragStart$ and catDragEnd$ . We need to combine them to form a new stream. Let's try and draw a small diagram of what that stream should look like.

In the image, ds symbolizes a dragstart event, and de represents a dragend event.
Our GIF is wrapped in an HTML element whose display attribute is set to "none" by default. We'll want to set it to "" (empty string) to make it visible and back to "none" once it's time to hide it again. Our side effect should look something like this:
1// shouldHideGIF would be true in case we need to hide the GIF2const v = shouldHideGIF ? "none" : "";3loading.style.setProperty("display", v);Let's try to build a stream to feed to this function a value for display that reflects whether the cat is being dragged or not. Our stream should remove the necessity of the imperative logic dictated by the ternary operator, we'll create values that react to changes to replace the imperative code.
First, let's look back at our streams catDragStart$ and catDragEnd$. When catDragStart$ emits a value, we want to set the display to "". So this means we need to somehow transform our stream of events into a stream of empty strings. Each time a string is emitted, we shall pass that value onto the function that will set the display property on the loading element.

Mapping each event to an empty string.
After you apply an operator, you transform your stream into a more refined one, ideally better suited to the task you're trying to tackle! You're making every pushed value to the topmost timeline flow through a function provided in the map operator. That function will map each value into the bottom timeline, your "final" stream. If you subscribe to it now, you will receive empty strings instead of DOM events!
The same thing should happen to catDragEnd$.

Mapping each event to 'none'.
Now we have two streams, and we could just subscribe to each one of them and set the value of the "display" property for the loading element!
1const catDragStartDisplay$ = catDragStart$.pipe(map((event) => ""));2const catDragEndDisplay$ = catDragEnd$.pipe(map((event) => "none"));3
4catDragStartDisplay$.subscribe((value) => loading.style.setProperty("display", value));5catDragEndDisplay$.subscribe((value) => loading.style.setProperty("display", value));Although this works, we could further refine our streams and merge them into a single one.

A single stream becomes the source of truth for the display property value of the loading element throughout time.
Awesome! The merge operator gives us the power to take to streams and merge them into one so that the values of the "display" flow through a single stream (a single source of truth). Here's how the code looks like.
1const catDragStartDisplay$ = catDragStart$.pipe(map((event) => ""));2const catDragEndDisplay$ = catDragEnd$.pipe(map((event) => "none"));3const display$ = merge(catDragStartDisplay$, catDragEndDisplay$);4
5display$.subscribe((value) => loading.style.setProperty("display", value));One subscription to handle the toggling of showing/hiding the GIF.
Bonus for Level 3
I feel overwhelmed by the tremendous amount of operators offered by RxJS, its API is considerably large. We could further simplify the above implementation with the operator mapTo.
1const catDragStartDisplay$ = catDragStart$.pipe(mapTo(""));2const catDragEndDisplay$ = catDragEnd$.pipe(mapTo("none"));3const display$ = merge(catDragStartDisplay$, catDragEndDisplay$);4
5display$.subscribe((value) => loading.style.setProperty("display", value));You get the same result as applying map but without needing to provide a function, because we're really not doing anything else rather than returning a hardcoded value on that inline function.
Note about the coding style
You've might have noticed that I'm creating a new variable per each stream, this allows me to better explain the building blocks of each solution and map them to the diagrams. Although this helps keeping the code readable, this is not mandatory, it can be overkill per times!. Streams can be inlined. Let's look again to a small refactor of the above solution to understand what I'm referring to.
1const display$ = merge(catDragStart$.pipe(mapTo("")), catDragEnd$.pipe(mapTo("none")));2
3display$.subscribe((value) => loading.style.setProperty("display", value));We could drop catDragStartDisplay$ and catDragEndDisplay$ by inlining them in the merge operator.
Level 4 - Flatten observables, timers and cancellation
- The cat needs to make it to the party in less than 5 seconds! He only has 5 seconds of gas in his bike.
We need to code a new path in our game, the one where the user loses the cat isn't dragged to the party within 5 seconds. This looks like a countdown, with a few actions tied to it:
- The countdown must be interrupted if the player manages to win within 5 seconds.
- In case the countdown ends, and the cat was not dropped anywhere, we need to display a "game over" message.
As in the previous levels, let's build this incrementally. First, let's build a countdown. To emphasize how RxJS shines here, let's first see how we would make a countdown with native JavaScript APIs.
1function countdown(seconds) {2 let secondsLeft = seconds;3 let intervalId;4
5 intervalId = setInterval(() => {6 if (secondsLeft === 0) {7 console.log("time's up!");8 clearInterval(intervalId);9 } else {10 console.log(secondsLeft);11 secondsLeft--;12 }13 }, 1000);14}15countdown(5);That's a rough implementation of a countdown. We need to keep track of the timer identifier in a variable to ensure we clean up after running the setInterval provided callback the expected amount of times.
Now here's how you can do the same with RxJS.
1const countdown$ = timer(0, 1000).pipe(2 map((t) => 5 - t),3 takeWhile((t) => t > 0),4);5countdown$.subscribe({6 next: (secondsLeft) => console.log(secondsLeft),7 complete: () => console.log("time's up!"),8});Let's examine the above code 🤯. This time we're not creating a stream from an event or anything like that. Instead, we use timer from RxJS to generate a timer stream that emits a new numeric value every second.
Now a timer emits values in ascending order (0, 1, 3, etc.). We'll want to reverse that to display an actual countdown. To reverse the numerical value on the stream, we simply use map. We should only give the user 5 seconds to drag the cat to the party. This translates to stop emitting values when we hit the mark of the 0 seconds, this is controlled by the takeWhile operator. A few evident advantages compared with the classic implementation:
- No global variables
secondsLeftandintervalId. - Less error-prone code by relying on
takeWhileand other built-in operators to be the rail guards of our business logic. - Once the stream emits the 6th value, it will complete automatically and stop emitting values! We don't need to worry about cleanup logic - with
setIntervalwe need to worry about cleaning the interval withclearIntervalso that it does not run indefinitely!
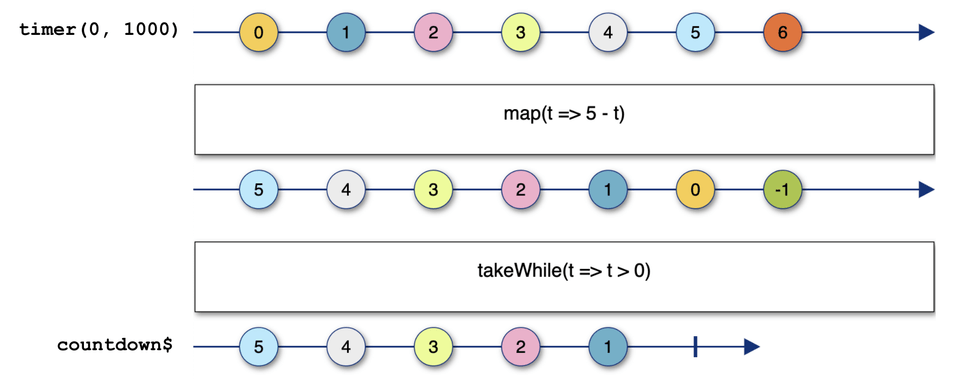
In the above image, the bottom timeline represents the stream; notice the pipe (|) at the end of the timeline indicates that the stream completes after emitting the value 1.
A crucial aspect to notice is that you'll trigger a new timer as soon as you subscribe. This is a Cold Observable. Our countdown$ will start emitting values right away upon subscription, so we can't just .subscribe() We'll have to subscribe to the countdown when the user starts dragging the cat element.
Now remember we had a stream catDragStart$; we'll use that to trigger our countdown. But how can we trigger a subscription to a stream from within another stream? In my opinion, this is a hard concept to comprehend.
Presenting the switchMap operator. switchMap allows you to trigger a subscription from within a stream to a second stream. Not clear yet? Think of it this way switchMap allows you to switch to a new observable. Ok, let's look at our countdown implementation, now that we have this information.
1const countdown$ = timer(0, 1000).pipe(2 map((t) => 5 - t),3 takeWhile((t) => t >= 0),4);5const countdownRunning$ = catDragStart$.pipe(switchMap((event) => countdown$));6
7countdownRunning$.subscribe((secondsLeft) => {8 countdown.innerText = `${secondsLeft}`;9});Note: You might have noticed that I'm using t => t >= 0 "greater or equal to" in our predicate. This is just for convenience, so that we get 0 pushed onto the stream to easily rendered it, finishing the countdown at 0.

We're switching from one stream to another and subscribing to it immediately.
Notice the return value of switchMap is countdown$, this means that when a dragstart event is emitted in catDragStart$ the following things will happen:
- Since we subscribed, the DOM event will flow through the pipe and hit our
switchMapoperator. - We'll automatically subscribe to
countdown$and start emitting its values leaving thedragstartevent behind (because we don't really need it for this task). - In our subscription handler, we simply do a DOM mutation to the element that displays our countdown value so that the user gets the time left displayed on the screen.
Once more, as soon as a ds (dragstart event in the diagram) is pushed to our catDragStart$ stream, switchMap will kick in and subscribe to our countdown$ stream, "passing the ball" (moving the flow of control) to the countdown$. We'll start to push to our subscribers the seconds left in the countdown like if we had subscribed to the countdown$ in the first place, but in this case we programmatically triggered the subscription.
Although we're going more deep into flattening Observables in this level, we've already seen this before in this article. If you're thinking about withLatestFrom from Level 1, you're right! That operator also triggers a inner subscription.
We can now leverage countdownRunning$ to display an alert.
1countdownRunning$.pipe(filter((secondsLeft) => secondsLeft === 0)).subscribe(() => {2 window.alert("Cat didn't make it! You lose!");3 window.location.reload();4});We have a filter to check for the second 0; this way, we're basically ensuring that we just emit a value when the countdown runs out. Similarly to Level 2, we have a delay with random time to safeguard our countdown value gets rendered with 0 on the screen before we trigger the alert.
Only one thing left! If you're following up until this point, you're probably wondering why the counter is not reset once you stop dragging the cat. See the following GIF to understand what I'm referring to.
Hmm.. Strange the counter does not reset once we drop the cat! It should, since the 5 seconds didn't ran out while we were dragging the cat.
Let's look at our countdown$ implementation once more.
1const countdown$ = timer(0, 1000).pipe(2 map((t) => 5 - t),3 takeWhile((t) => t >= 0)4);5const countdownRunning$ = catDragStart$.pipe(switchMap((event) => countdown$);Now, it's pretty clear that we're not doing anything to "stop" the counter. Once we subscribe to countdown$ with the switchMap operator, there's no stopping it, it will go on until it reaches the end, and when this happens, we'll display the alert to the user. Ideally, we would stop the counter upon any of the two following events:
- When the cat arrives at the party. Also partially done, we have a stream
catAtParty$, once a value is pushed into this stream, you know thecatwas dropped at theparty. - We stop dragging the cat. We already have a stream
catDragEnd$, each emitted value means we just dropped thecatelement. You might be thinking the first point would be enough, but remember the cat can be dropped literally anywhere on the screen. We have no guarantees that it will get dropped at the party.
Meet takeUntil, this operator allows you to listen to a stream until something happens! Let's look at the implementation of the countdown$.
1const countdown$ = timer(0, 1000).pipe(2 map((t) => 5 - t),3 takeWhile((t) => t >= 0),4 takeUntil(/*something we'll figure out later*/),5);Now, what is the argument of the takeUntil operator? takeUntil receives a stream, once that stream emits a value, our countdown$ will stop emitting, thus canceling the timer and giving our users another chance to dragging the cat to the party.
But we have two streams, catDragEnd$ and catAtParty$, can we make it one? Yes, we can! We've already met merge! This operator can take multiple streams and combine into a single one, think of it as a funnel.
Let's call this last stream cancelCountdown$. After we declare it, we can feed it as an input to our takeUntil operator. Here's the final implementation of Level 4 with cancellation.
1const cancelCountdown$ = merge(catDragEnd$, catAtParty$);2const countdown$ = timer(0, 1000).pipe(3 map((t) => 5 - t),4 takeWhile((t) => t >= 0),5 takeUntil(cancelCountdown$)6);7const countdownRunning$ = catDragStart$.pipe(switchMap((event) => countdown$);8
9countdownRunning$.subscribe((secondsLeft) => {10 countdown.innerText = `${secondsLeft}`;11});12countdownRunning$13 .pipe(14 filter((secondsLeft) => secondsLeft === 0),15 delay(100)16 )17 .subscribe(() => {18 window.alert("Cat didn't make it! You lose!");19 window.location.reload();20 });
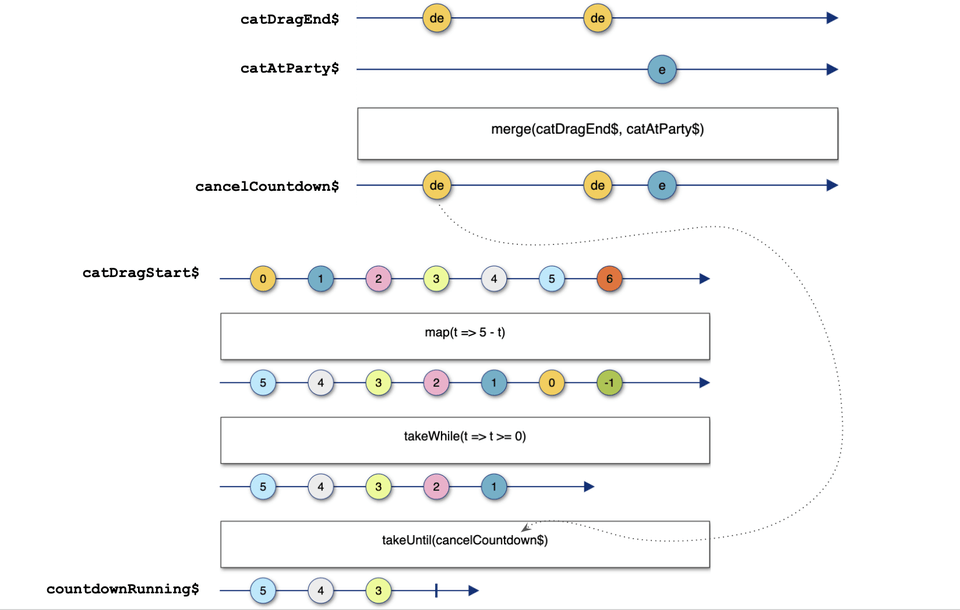
In this diagram, our stream gets cancelled after the value 3 is published. The first dragend event causes the countdownRunning$ to stop emitting values.
You can check out the complete implementation of this challenge here.
Closing Notes
Here are the concepts you've learned by building this game:
- Creating streams from DOM events.
- Manipulating streams with basic operators such as
map,filter. - Combining streams with operators such as:
withLatestFrom,switchMap, andmerge. - Cancellation, being able to stop listening to a specific stream based on another. In our last level, we used
takeUntilto achieve this.
Now go out there and try to apply these concepts to build your own applications. I would be pleased to hear from you if you've learned something here today.
In the upcoming articles, I'll share with you the good and bad parts of adopting reactive programming and start using RxJS in your codebase, and at last, I'll share with you a bunch of fantastic resources to learn RxjS and reactive programming.
- Part 1 - Why You Should Consider Reactive Programming
- Part 2 - Fundamentals of Reactive Programming
- Part 3 - Hands-on Reactive Programming with RxJS
- Part 4 - Reactive Programming: The Good and the Bad
- Part 5 - Awesome RxJS and Reactive Programming Resources
If you liked this article, consider sharing (tweeting) it to your followers.